
Showing posts with label Technical Folder. Show all posts
Showing posts with label Technical Folder. Show all posts
Tuesday, 19 April 2016

Monday, 18 April 2016


Sunday, 27 March 2016
Testing for Claudia's make-up


Thursday, 17 March 2016
Contemporary Victorian Hairstyles inspired by 'American Horror Story'
PRODUCTS USED:
Other products that can be used:
TOOLS USED:
HOW TO:


REMOVING:
Simply remove the hairpins and brush the hair.
MY RESULTS:


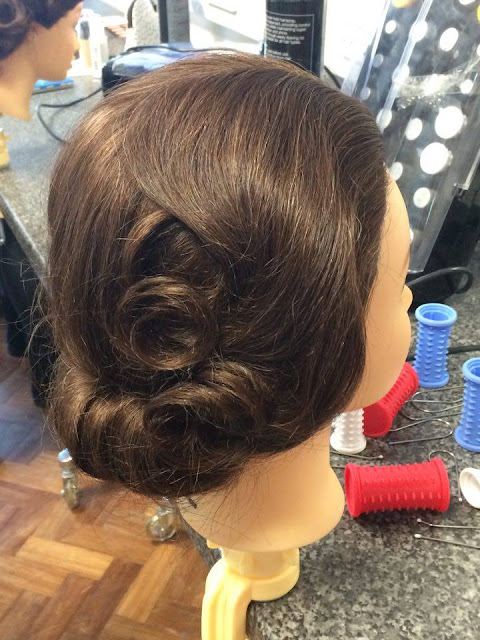
REFLECTION:
Loved this hairstyle! Whish I had more time to work at it but I will definitely do it again!
- Styling foam;
- Hairspray.
Other products that can be used:
- Heat protector.
TOOLS USED:
- Heated rollers;
- Roller pins;
- Hairpins;
- Pintail comb;
- Hairbrush.
HOW TO:


- Start by sectioning the hair in three sections and then do a centre parting at the front section;
- Insert the red rollers on the sides of the centre parting, doing medium lenght pieces of hair rolled on them;
- Clip the rollers in place;

- Start doing brickwork with the second section of the hair with the blue rollers in the direction of the hair, starting with one or two bricks and ending with three or four;
- Clip the rollers;
- Roll the back and the last section of the hair on the white rollers upwards;
- Clip the hair;

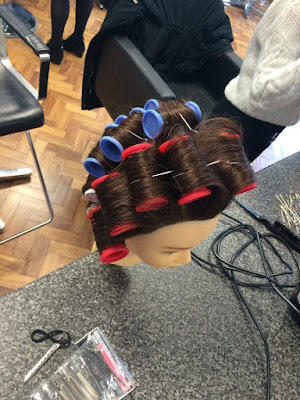
- Once set, let the hair down;
- Pin the front section, we will need it later;
- Backcomb the crown section;
- Roll the remaining hair upwards just as we did with the white rollers to create something like a pretzel bun;

- Comb the front section and place the end of the hairs, curled, on the sides;
- Finish with hairspray.


REMOVING:
Simply remove the hairpins and brush the hair.
MY RESULTS:


REFLECTION:
Loved this hairstyle! Whish I had more time to work at it but I will definitely do it again!
Tuesday, 15 March 2016
Creating scars using moulds
These days I've been really ill and I've missed some classes but I came today at Sue's lesson because I really didn't want to miss the technical stuff as I don't think I'll make it to the catch up session due to a collaboration with Winchester School of Art. Today could have been way more fun if I wouldn't have been late, but I tried to do my best in the time that was left.
PRODUCTS USED:
TOOLS USED:
HEALTH AND SAFETY:
Other information:
HOW TO:
REMOVING:
MY RESULTS:


REFLECTION:
I know. I know. My results don't look real or anything and it just looks like a bad joke but I haven't got enough time to blend the edges as I was really late to the lesson. Next time I will focus more and do my best, this time was just a failed trial.
PRODUCTS USED:
- Gelatine mould (can be filled with gelatin/silicone);
- Petrolese - a release spray that you need to spray the mould before;
- Pros-aide: prosthetic glue;
- Pro-clean: special remover;
- Witch hazel;
- Powder;
- Supracolour;
- Isopropyl alcohol;
- Dark blood;
- Wound filler.
TOOLS USED:
- Baby buds;
- Scissors;
- Brushes;
- Fibrous orange sponge;
- Bowls;
- Powder brush/puff.
HEALTH AND SAFETY:
- Always gown the model to prevent dirt on the clothes or accidentally spilling of blood;
- Ask your model if she/he is allergic to one of the prducts, especially the glue (latex).
Other information:
- To blend the edges, use witch hazel on a baby bud in downwards motions.
- You may have to trim the edges of the mould slightly. It's better to have some rough edges as they won't show up as much on camera in comparison to straight edges;
HOW TO:
- Apply glue on both the place where it's going to be stuck and the back of the mould (it is a contact glue);
- Make sure that both sides are dry - they will be completely clear;
- Stick the mould on the skin - you have to press hard to make sure it is completely stuck on the skin;
- Blend the edges with a baby bud with witch hazel (or with latex);
- Powder the area to see what edges need melting away;
- Clean away any excess glue around the edges, making sure not to go under the mould as it will cause it to unstick;
- Colour the wound. Make sure that the colour is translucent and not heavy. If the edges are too hard, bring lightly over the edge;
- Apply supracolour to colour the scar, you can dillute it with IPA;
- Play with colouring (add black into the hole);
- Add wound filler into the hole;
- Apply generous amounts of blood and let the hand hangind down a bit so the blood will look like it was flowing naturally.
REMOVING:
- Easily gently peel of the mould and then use make-up cleanser to remove anything left.
MY RESULTS:


REFLECTION:
I know. I know. My results don't look real or anything and it just looks like a bad joke but I haven't got enough time to blend the edges as I was really late to the lesson. Next time I will focus more and do my best, this time was just a failed trial.
Saturday, 12 March 2016
Final hair chart for Quentin

This is the final hairchart for Quentin, he will have mud and blood on his hair especially on his fringe, which will be longer than the rest of the hair. He will have kinda messy hair because he founght with Mrs. Laderman before he killed her.
Final face chart for Quentin

So this is my final facechart for Quentin. He will still look beautiful but sinister and creepy, he will have blood splatters and finger traces with blood on his face from the victim (Mrs. Laderman). He will be dirty with mud on his face/hair and especially on his hands wich will be the main focus of the make-up, because my character supposedly killed Mrs. Laderman stabbing her and then buried her with his own hands in the forest. He will have very dark inner corners to suggest that he was very upsed and didn't sleep a lot and he will have tears in his eyes made with glycerin. For the mud I will use fuller's earth and other colourants such as hairspray, food colouring, fake blood etc. I will use a perfume-spray like to spray the blood onto his face and clothes, because the clothes have to be dirty too. He will have nice eyebrows and blue eyes though, because he is Claudia's imaginary boyfriend and he has to look still nice.

Final face chart for Claudia

Thursday, 10 March 2016
Collage photos from both timed assessments
Left picture: first assessment. Right picture: second assessment.


Claudia, Quentin, Mrs Laderman second face charts
Claudia:
After updating/changing the story I think that it's time to change the facecharts too. Claudia will have half of the face burned by acid, with her earsn and half of the nose too. On the still beautiful side of her face, she had beautiful eyeliner with soft smokey eye but then she started crying and smudged the make-up on the lower eyelid. Her eyebrows can be full and her lips slowly fading from deep pink to pale pink at the edges of the lips.

Mrs. Laderman:
Mrs Laderman will be stabbed by Quentin in Claudia's dream and buried in the woods, that's what explains the mud and dirt on the edges of the facechart and even on its face. She will look beaten and she will bleed from her mouth, nose and neck stab too. Her eyebrows are bushy but pretty and their colour will be grey.

Quentin:
He is Claudia's imaginary boyfriend and he killed Mrs. Laderman because she wanted "revenge". He had beautiful blue eyes with beautiful eyebrows as well. Stains on his face are made by the victim who was helplessy trying to escape and fight the attacked - Quentin. He has blood and mud in some plces, including his hair. He will be very contoured to make him look prettier.

Claudia, Quentin, Mrs Laderman first hair charts
Sorry for the bad drawings but I had no patience left at all to do tomething prettier. The description of the hair ideas is noted on the hairchart, there is nothing too complicated that cannot be achieved.


Really sorry for this Quentin.
Claudia, Quentin, Mrs Laderman first face charts
CLAUDIA:
Claudia is a beautiful girl with nice eyebrows and blue eyes. This facechart represents her after she stabbed Mrs. Laderman, with blood splashes on her neck and face and with tears running down her face. The eyeliner underneath will be a bit smudged and she will have a soft smokey eye. Her lips will be pink and faded from interior to exterior. Her face will be contoured. The tears can be made with glycerin and the blood splashed with a paint brush.

MRS. LADERMAN:
Mrs. Laderman is in her '40s but looks older than she actually is. She has fine but visible wrinkles at her eyes and on the forehead. She has her face contoured downwards to create the illusion of older, saggy face. Her eyebrows are bushy and have a grey/brown/ashy tint. Her lips are mixed pink with brown and she has her lips wrinkled a little bit. Her eyes are brown. The stab would can be on her neck and she will also have blood sprinkles on her face. and chest and obviously blood running out of her neck.

QUENTIN:
He will be portrayed as a monster that returned from hell. He has fire in his eyes and he is full of dirt and mud, he has blackeyes and his mouth is full of blood with rottenteeth and creepy overall.

Tuesday, 8 March 2016
Timed assessment 2
Ok, so the second timed assessment is finally over. That means that the timed assessments are over. That means that I am happy. Happy for that and happy that almost everything went well. I liked how the result turned out the second time except for the hair which I felt that didn't look 100% exactly the same, but anyway you couldn't tell the difference without having multiple looks at the first assessment picture and the second. I followed the exact same steps as I did at the previous exam when it comes to the make-up application, except that I used a different foundation because in the meantime I ran out of the Make Up Forever HD one. But Kryolan worked well though I couldn't mixt it with anything else as this one is a grease-based foundation (really good looking on a dry skin) and the other ones I've got (and the moisturizers as well) were water based. About the photography, because I didn't take lighting setups at the previous assessment, I just used whatever setup it was at the moment and it turned out to be a bit different but that's it. At least the make-up was completely the same. And the brows, oh, the brows...


Thursday, 3 March 2016
Continuity notes for TA - Updated
Make-up
Hair
- Cleanse (Garnier micellar water), tone (studio toner), moisturize (Simple moisturizer), moisturize the lips (Carmex);
- Apply eye cream (Balea);
- Apply more moisturizing cream instead of mattifying face base, because the finish should be more natural and the model's skin is a little bit dry;
- Color correcting: green for red spots and orange for dark circles (Parisax color correcting concealer palette);
- Foundation: mix 5 pumps of MUFE HD with 1 pump of Paris Berlin waterproof and 1 pump of Paese mattifying base. Apply with a flat brush and dab with a beautyblender;
- Apply highlighting cream on the areas to be highlighted (Inglot) with a micro mini beautyblender;
- Apply concealer (Astor 24H) under the eye, blend with micro mini;
- Set the under eye area with loose powder (Ben Nye) and a flat natural bristled brush. Be careful to set only under the eyes;
- Cream contouring: Kryolan palette shades L0 and 6650 mixed: the cheekbones, the forehead, the nose, the jawline. Blend everything with a beautyblender;
- Apply cream blusher (MUFE HD) with a stippling brush and blend;
- Highlight with a powder highlighter (The Balm Mary Loumanizer) the cheekbones and the nose bridge;
- Apply a small amount of loose powder all over the face;
- Eyebrows: contour lightly with the lightest shade in the Essence brow kit, brush upwards and set with Anastasia Beverly Hills clear brow gel;
- Apply MAC taupe eyeshadow in the inner corner of the eyebrows to the nose with a fluffy blending brush;
- Apply Ga-de Creme Matte eyeshadow in the inner corner and on the browbone;
- Curl the eyelashes, apply Anastasia Beverly Hills clear gel instead of Rimmel mascara to set the eyelashes;
- Lips: wipe the foundation with a baby bud and apply more Carmex lip balm, then apply a bit of gloss on top (Avon).
Hair
- Comb the hair;
- Create the centre parting with a sharp-ended comb;
- Apply small amount of green hairgel from the studio on both sides and at the back;
- Comb and re-arrange the hairs;
- Curl with a medium tong the fringe on the forehead;
- Set with second layer of gel;
- Apply hairspray and set with the hands.
Tuesday, 1 March 2016
Timed assessment 1
I am pretty excited about how this assessment went. Everything was good, I had enough time to finish the look, my model helped me a lot with caring for his skin to look its best, everything was carefully planned and prepared and I think that the result is beautiful too. I think I've managed to recreate Dorian Gray as he would have been in the late-Victorian era, young, charming and with attitude (except for the fact that in the book he had longer hair, but this could have been him after a visit to the barber).
I took continuity notes during the assesment as well because I have changed some stuff during the assessment because I thought that this would look better.
The only regret I have is that I didn't take continuity notes for the photography to make sure that next time it will look the same... but to be honest people were waiting in the queue for me to finish taking pictures after the assessment and I was too nervous to remember taking notes.
That's how the finished result looks:


Subscribe to:
Posts (Atom)